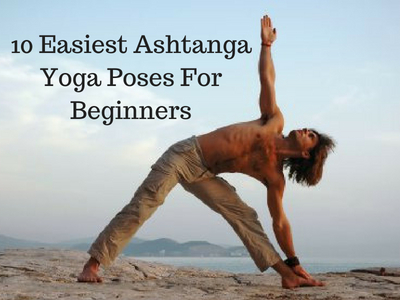
10 Easiest Ashtanga Yoga Poses For Beginners
Disclosure: As an Amazon Associate I earn from qualifying purchases. This page may contain affiliate links, which means I may receive a commission if you click a link and purchase something that I have recommended. There is never an additional cost to you.
Ashtanga Yoga is hard enough for seasoned yoga pros but for beginners it’s almost impossible. We decided to make a list of the easy Ashtanga Yoga poses so you can try them and see if you like them. But, be warned, they are not all this easy. Some are very difficult indeed!
What is Ashtanga Yoga?
Ashtanga Yoga is is a highly structured vinyasa-style class. There are five Ashtanga asana series and each student must master every pose of the first series before moving onto the second series.
There are many types of yoga, but ashtanga is definitely one of the most physical. It involves a set series of movements, exactly the same every time, that takes just over an hour to complete. You’re either holding a posture for five deep breaths, or moving into the next one. That’s what appeales to people about ashtanga: once you start, you move right to the finish.
There are a lot of postures to get through, and it’s quite demanding. I’ve seen gym-oriented people who go to an ashtanga yoga class and are surprised by how physical it is. You’re using all your muscles, including ones you don’t even realise you’ve got. It’s a great way to keep fit. I’m more muscular than I was and so much stronger, especially in my upper body, arms and back.
Who Invented Ashtanga Yoga?
K. Pattabhi Jois was an Indian Yoga teacher and Sanskrit scholar who developed and popularized the vinyāsa style of yoga referred to as Ashtanga Yoga.
In 1948, Jois established the Ashtanga Yoga Research Institute (now known as theK.Pattabhi Ashtanga Yoga Institute in Mysore, India. Pattabhi Jois is one of a short list of Indians who were instrumental in transmitting yoga from India to the West in the 20th century.
What can I expect in an Ashtanga Yoga class?
Beginners beware! These sessions are tough enough for a seasoned pro, but for a beginner, it’s probably best to start off elsewhere, then once developed with that style of Yoga, give Ashtanga a try. It’s just so structured. If you really like structure and preciseness, then maybe you’ll get the hang of it. The flow of poses are definitely more challenging than in regular yoga practices. The Primary Series alone involves a lot of contortion-esque poses and many of the poses require strong-arm and core strength, which is built over time through the multiple vinyasas.
I would say the difficulty level of Ashtanga Yoga is 9/10
What are the easiest poses for Ashtanga Yoga?
1. Extended Triangle Pose (Trikonasana)
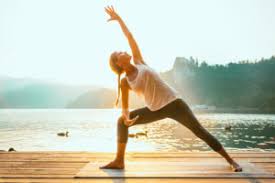
With the Extended Triangle pose (Utthita Trikonasana) physical alignment is quite exacting. When all the elements come together — stretch and strength, rooting and expansion — the result is a beautifully expressive pose that balances the grounding through our foundation with the lift of our peak, and reconnects body, breath and mind.
How to do the Extended Triangle Pose-
- Stand in Tadasana. Inhale and Exhale as you stretch the arms out at shoulder height and Separate the feet 3 – 3.5 feet apart.
- Turn the right foot out 90 degrees and the turn the left foot in slightly.
- Press the inner and outer of edges of the feet as you did in Tadasana and extend the torso over towards the right leg.
- Place your right hand on a block or right shin and stretch your left arm up towards the ceiling with the palm facing forward.
The legs are stretched as in Tadasana. The arms are externally rotated as in Urdhva Hastasana and the torso is extended from the pelvis through the crown of the head. - To come out, press the feet firmly and lift the torso back up to vertical.
- Turn the feet back to parallel as you take a breath and then on an exhale turn the left foot out and the right foot slightly in and repeat on the left side.
Benefits of the Extended Triangle Pose are:
- Stretches and strengthens the thighs, knees, and ankles
- Stretches the hips, groins, hamstrings, and calves; shoulders, chest, and spine
- Stimulates the abdominal organs
- Helps relieve stress and anxiety
- Improves digestion
- Helps relieve the symptoms of menopause
- Relieves backache, especially through second trimester of pregnancy
- Therapeutic for depression, anxiety, flat feet, infertility, neck pain, osteoporosis, and sciatica
2. Shoulder Stand Pose (Sarvangasana)
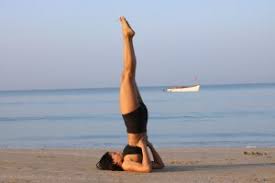
Ok. Yes, I am kidding. This one isn’t easy at all. Well, it is if your supple and flexible, but I thought I would add it because it’s a great Ashtanga pose for you to try.
Its an inverted yoga pose that stretches the back of the neck while strengthening the spine and core muscles. It is appropriate for intermediate to advanced yoga students. Shoulderstand is such an important pose with so many benefits that it is referred to in many yoga traditions as the “Queen” or “Mother” of all yoga postures (“asanas” in Sanskrit). The “King” or “Father” of all asanas is Headstand, which is often performed in conjunction with Shoulderstand.
How to do it-
- Start by lying flat on your back with your legs extended and your arms at your sides, palms down. Bend your knees and place the soles of your feet flat on the floor.
- On an inhalation, use your abdominal muscles to lift your legs and hips off the floor. Curl your torso and bring your knees in toward your face. Then, lift your hips and bring your torso perpendicular to the floor.
- Bend your elbows and place your hands on your lower back with your fingertips pointing up toward the ceiling. Keep your elbows on the ground, shoulder-width apart. Do not let your elbows splay out to the sides.
- When you are comfortable, lift your thighs so they are vertical to the floor, keeping your knees bent. Draw your tailbone toward your pubic bone. Then, straighten your legs fully and reach your feet up to the ceiling. Lift through the balls of your feet.
- Try to bring your shoulders, hips, and feet into one line.
- Keep your head and neck in line with your spine and do not turn your head. Draw your shoulder blades firmly into your upper back. Keep a space between your chin and chest, and soften your throat. Gaze toward your chest.
- Hold the pose for 10-25 breaths. More advanced practitioners can hold the pose for five minutes or longer. To release the pose, slowly lower your feet back to the ground, coming into Plow Pose (Halasana) with your hands supporting your back. Then, release your hands to your sides and slowly roll down, one vertebra at a time, bending your knees if you need to. Then, come into Fish Pose (Matsyasana).
Benefits of the Shoulder Stand Pose are:
- Helps relieve the symptoms of menopause
- Stimulates the thyroid and prostate glands and abdominal organs
- Stretches the shoulders and neck
- Tones the buttocks and the legs
- Improves digestion
- Reduces fatigue and alleviates insomnia
- Therapeutic for asthma, infertility, and sinusitis
- Calms the brain and helps relieve stress and mild depression
3. Upward Facing Dog Pose (Urdhva Mukha Svanasana)
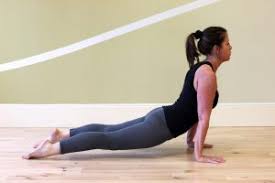
Upward-Facing Dog Pose — Urdhva Mukha Svanasana (OORD-vuh MOO-kuh shvan-AHS-uh-nuh) — is a back-bending yoga posture that lengthens and strengthens the spine, torso, and arms.
How to do it-
- Begin by lying face-down on the floor with your legs extended behind you, spread a few inches apart. The tops of your feet should rest on the mat— do not tuck your toes, as this can crunch your spine.
- Place your hands on the floor alongside your body, next to your lower ribs. Point your fingers to the top of the mat and hug your elbows in close to your ribcage.
- Inhale as you press through your hands firmly into the floor. Straighten your arms, lifting your torso and your legs a few inches off the floor.
- You can also enter the pose by starting in plank, then lowering into Chaturanga From Chaturanga, draw your body forward by pressing through your palms and rolling over your toes. Align your shoulders directly over your wrists and straighten your arms.
- Press down firmly through the tops of your feet. Strongly engage your leg muscles to keep your thighs lifted off the floor.
- Keep your elbows pressed alongside your body. Drop your shoulders away from your ears and lift your chest toward the ceiling.
- Draw your shoulders back and your heart forward, but do not crunch your neck. If your neck is flexible, tilt your head to gaze toward the sky. Otherwise, keep your head neutral and your gaze directly forward.
- Your thighs should be firm and turned slightly inward. Your arms should also be firm, slightly turned so that each elbow crease faces forward.
- Only straighten your arms as much as your body allows. Deepen the stretch as your practice advances, but avoid straining to achieve a deeper backbend.
- Actively press your shoulder blades into your upper back. Keep your elbows hugged in to your sides. Broaden across your collarbone and lift your heart. Glide the tops of your shoulders away from your ears. Distribute the length of the backbend evenly through your entire spine.
- Hold the pose for up to 30 seconds. To release, exhale as you slowly lower your torso and forehead to the mat. Turn your head to the right, resting your left ear on the mat. Relax your arms alongside your body. Repeat the pose up to five times. Those practicing Sun Salutations should move directly from Upward-Facing Dog into downward facing dog by lifting their hips and rolling over their toes to press the soles of their feet on the mat.
Benefits of Upward Facing Dog are:
- Stretches the chest and spine
- Strengthens the wrists, arms, and shoulders.
- Strengthens and opens up the upper body and chest
- Improves posture
- Therapeutic for asthma.
- Creates suppleness in the back torso and abdomen
- Stimulates the abdominal organs
- Improves digestion.
- Firms the buttocks and thighs
- Helps to relieve sciatica.
- Energizes and rejuvenates the body,
- Provides relief from fatigue and mild depression.
4. Hand-to-Big-Toe Pose (Utthita Hasta Padangustasana)
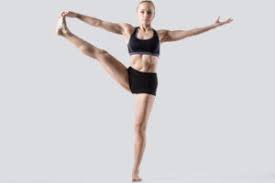
Standing Hand to Big Toe Pose is an intermediate yoga posture that stretches the backs of your legs while challenging your balance. It is a great preparatory pose for deeper hamstring stretches, such as Standing Split (Urdhva Prasarita Eka Padasana) and Monkey Pose (Hanumanasana).
How to do it-
- Begin standing in Mountain Pose with your feet together and arms at your sides. Breathe deeply and draw your awareness to the present moment. Let your mind be calm.
- Shift your weight to your left foot. Very slowly, draw your right knee up toward your chest. Bring your right arm to the inside of your right thigh. Then loop your index and middle fingers around your right foot’s big toe. Place your left hand on your left hip.
- Straighten your spine. Strongly engage your abdominal muscles and the muscles of your left leg. Straighten your left leg, but do not lock your knee.
- On an exhalation, extend your right leg forward. Straighten your right leg as much as possible.
- Keep both hips squared forward and keep your spine straight. Do not scrunch your neck or shoulders; keep them soft and relaxed.
- Drop your right hip slightly so it is in line with your left hip. Bring your awareness to your midline — the line that runs directly down the center of your body.
- Hold for 5-20 breaths. To release, draw your knee back into your chest, then slowly lower your foot to the floor. Come back to Mountain Pose. Then repeat on the opposite side for the same amount of time
Benefits of the hand to toe pose are:
- Strengthens and stretches the legs and ankles.
- Deeply stretches the hamstrings (the back thigh muscles).
- Opens up the hips, shoulders, and arms.
- Challenges and improves your sense of balance.
- Develops greater concentration and focus.
5. Wide-Legged Forward Bend Pose (Prasarita Padottanasana)
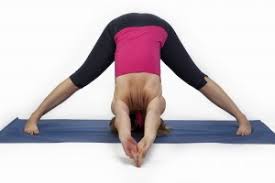
Wide-Legged Standing Forward Fold is a calming forward bend that stretches the hamstrings and back. There are several arm variations and other modifications available, making this a suitable pose for yoga students of all levels!
This pose is also sometimes called “Straddle Fold,” “Standing Straddle,” and “Wide-Legged Forward Bend,” among other variations. However, its Sanskrit name is “Prasarita Padottanasana” (prah-suh-REE-tuh pah-doh-tahn-AHS-uh-nuh)
How to do it-
- Begin in Mountain Pose. Bring your hands to your hips. Turn to the left and step your feet wide apart. Turn your toes slightly in and your heels slightly out so the edges of your feet are parallel to the edges of your mat. Align your heels.
- Inhale and lengthen your torso, reaching the crown of your head up toward the ceiling. Exhaling, fold forward at the hips. Keep the front of your torso long. Drop your head and gaze softly behind you.
- Bring your hands to rest on the floor between your legs. Keep your elbows bent and pointing behind you. If your hands do not come to the floor, rest them on Yoga blocks
- Shift your weight slightly forward onto the balls of your feet.
- Keep your hips aligned with your ankles, then walk your hands back even further. Work toward bringing your fingers in line with your toes (and eventually with your heels), and bringing your elbows directly above your wrists.
- Strongly engage your quadriceps and draw them up toward the ceiling.
- Lengthen your spine on your inhalations and fold deeper on your exhalations.
- Bring the crown of your head down further, resting it on the floor if possible.
- Hold for up to one minute. To release, bring your hands to your hips. Press firmly through your feet and inhale to lift your torso with a flat back. Step your feet together and return to Mountain Pose.
Benefits of the Wide-Legged Forward Bend Pose are:
- A calmed mind
- Relief from stress, anxiety, and mild depression
- Relief from mild backaches
- Opened hips
- Relief from neck and shoulder tension
- Toned abdominal organs
- Improved digestion
- Quiets and soothes the nervous system.
- Helps prepare the body and mind for deeper yoga poses and introspection.
- Stretches and strengthens the hamstrings, calves, hips, low back, and spine.
- The various arm positions stretch your shoulders, wrists, forearms, and upper back.
6. Bound Angle Pose (Baddha Konasana)
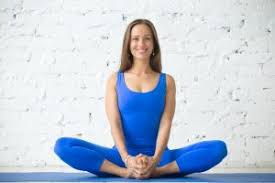
Bound Angle Pose is a well-known seated yoga posture that opens the hips and groins. It is also sometimes called “Cobbler’s Pose,” after the way cobblers in India sit on the ground to work on footwear. The Sanskrit name for this pose — “Baddha Konasana (BAH-duh cone-AHS-uh-nuh)” — comes from three words:
- “Baddha” — meaning “bound”
- “Kona” — meaning “angle”
- “Asana” — meaning “pose”
How to do it-
- Begin seated in with your spine straight and your legs extended in front of you on the mat. Rest your arms at your sides with your palms on the mat.
- Bend your knees and draw your heels in toward your pelvis. Press the soles of your feet together and let your knees drop open to both sides. It’s important to allow your knees to drop open only as far as they will go — never press on your knees in this pose!
- Clasp your big toes with your first two fingers. Press the outer edges of your feet firmly together, and also press them firmly into the floor.
- Sit up straight. Extend through the length of your entire spine through the crown of your head.
- Gaze softly straight ahead, or at the tip of your nose.
- Hold the pose for up to five minutes. To release the pose, first release the clasp from your toes. Then, gently lift your knees and extend your legs once again along the floor in Staff Pose (Dandasana).
Benefits of the Bound Angle Pose are:
- Stretches the hips, groins, knees, and inner thighs.
- Improves circulation and blood flow throughout the entire body, but especially in the pelvis, which can soothe menstrual discomfort and symptoms of menopause.
- Increased pelvic blood flow also helps to ease sexual tension and frustration.
- Baddha Konasana is particularly beneficial for women who are pregnant, as it can aid in childbirth.
- Practicing this pose stimulates the heart, abdominal organs, kidneys, ovaries, and the prostate gland.
- Therapeutic for sciatica, flat feet, high blood pressure, infertility, and asthma.
- Ancient texts claim that this pose will destroy disease and fatigue.
- Sitting upright with your spine aligned also calms the mind to reduce stress, anxiety, and mild depression.
7. Seated Forward Bend (Paschimottanasana)
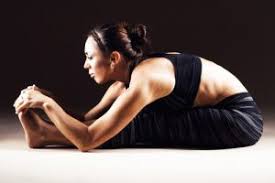
This helps you stretch the hamstrings and the back. Never force the stretch – use pillows or bolsters to ease into the posture. As you build flexibility and knowledge of the posture, you’ll use the props less.
How to do the Sitting Forward Bend-
- Sit erect, with your legs, stretched out in front of you. Make sure that your toes are flexed towards you.
- Inhale and raise your arms over your head. Stretch.
- Exhale and bend forward. Feel the fold from your hip joints. Your chin should move towards your toes.
- Stretch out your arms, and let them reach the furthest they can, possibly till your toes. But make sure that you don’t stretch too far.
- Inhale. Then, lifting your head slightly, elongate your spine.
- Exhale and move your navel towards your knees.Repeat this a few times.
- Then, place your head on your legs, and hold the pose.
- Inhale and come up back to the sitting position with your arms stretched out.
Benefits of the Sitting Forward Bend are:
- Calms the brain and helps relieve stress and mild depression.
- Stretches the spine, shoulders, hamstrings.
- Stimulates the liver, kidneys, ovaries, and uterus.
- Improves digestion.
- Helps relieve the symptoms of menopause and menstrual discomfort.
- Soothes headache and anxiety and reduces fatigue.
8. Chair Pose (Utkatasana)
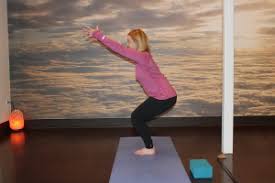
This is a standing yoga pose that tones the entire body, particularly the thighs! .” Its Sanskrit name comes from the words “utkata” (meaning “powerful” or “fierce”) and “asana” (meaning “pose”). It can sometimes be quite a fierce pose for your thighs and it gets your heart pumping quickly. A great exercise to Yoga Weight Loss is a massive bonus!
How to do it-
- Begin with a standing position
- Bend the knees until the thighs are almost parallel to the floor.
- Keep the butt low.
- Raise the arms up towards the ceiling.
- Bring a slight back bend into the upper back s if you are about to sit in a chair.
- Hold 5-10 breaths.
- Repeat 5 times
Benefits of the Chair Pose are:
- Improves circulation in the knee, toe and ankle joints.
- Helps with the regular weight loss programmes
- Tones the thigh, lower leg, leg and knee muscles
- Stretches and exercises the spine, hips and mid section muscles
- Helps strengthen the lower back and torso.
- Balances the body
- Helps to cure slipped disc and lumbago in the lower spine.
- Strengthens and firms upper arms and all muscles of thighs, calves and hips.
9. Warrior Pose I (Virabhadrasana I)
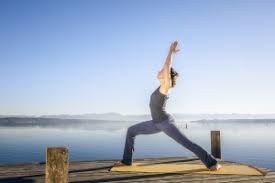
In Hindu mythology, the warrior pose is named after the fierce warrior Virabhadra. This poses helps center your balance, focus and determination. It’s a great pose for Yoga Weight Loss as it strengthens and stretches the thighs, abdomen, calves and back muscles all in one gentle pose!
How to do it-
- Breathe normally, then inhale and step the right foot forward and bend into the right knee.
- Raise both arms up and lock the fingers together with the index fingers pointing up.
- Keeping the head in between the elbows then arch the back.
- Breathe out bringing the arms to the sides and shift the weight back so that the right knee comes back under the body next to the left knee.
- Hold 20 seconds.
- Repeat 3 times on each side.
Benefits of the Warrior pose are:
- Increased flexibility of the legs, hips & groin
- Increases strength in Shoulders, Arms & back
- Improves balance and stability
- Tones abdominal muscles
- Relieves lower & upper backaches and also sciatica.
- Can be beneficial in case of frozen shoulder.
- Improve balances in the body, helps increase stamina.
- Releases stress in the shoulder very effectively in a short span of time.
- Very beneficial for those with sedentary or desk bound jobs.
- Brings calmness , courage, grace and peace.
10. Corpse Pose (Savasana)

This reclining posture doesn’t always need props, but some people are more comfortable resting on a bolster with a pillow under the head. Take your time with this one – it’s extremely relaxing.
How to do the Corps Pose-
- Neatly, place a blanket lengthwise along the length of your sticky mat.
- Lie Down on your back and stretch the legs in Supta Tadasana. See that you are in the center of sticky mat.
Adjust the shoulders down your back as you did in Supta Padangustasana. - Allow your two feet to fall apart from one another, relaxing your leg muscles.
- Turn your upper arms from the inside out and place the arms equidistantly about 6 inches away from your body. The palms are turned up towards the ceiling.
- Relax every muscle in your body from the tip of your toes to the top of your head.
- Consciously relax the body and in so doing, quiet the mind and move into a deep relaxation for 15 minutes a day, if possible.
Benefits of the Corpse Pose are:
- Shavasana relaxes your whole body.
- Releases stress, fatigue, depression and tension.
- Improves concentration.
- Cures insomnia.
- Relaxes your muscles.
- Calms the mind and improves mental health.
- Excellent asana for stimulating blood circulation.
- Beneficial for those suffering from neurological problem, asthma, constipation, diabetes, indigestion.
- This posture brings a deep, meditative state of rest, which may help in the repair of tissues and cells, and in releasing stress. It also gives time for the yoga workout to sink in at a deeper level.
- This posture leaves you in a state of rejuvenation. It is the perfect way to end a yoga session, particularly if it has been a fast-paced one.
- It helps reduce blood pressure, anxiety, and insomnia.