These 10 Yoga Poses will reduce your Menopause symptoms Starting Today!
Disclosure: As an Amazon Associate I earn from qualifying purchases. This page may contain affiliate links, which means I may receive a commission if you click a link and purchase something that I have recommended. There is never an additional cost to you.
Welcome to our post “These 10 Yoga Poses will reduce your Menopause symptoms Starting Today!”
We already know what the Menopause is from our post “What are the benefits of Yoga for Menopausal Women?”
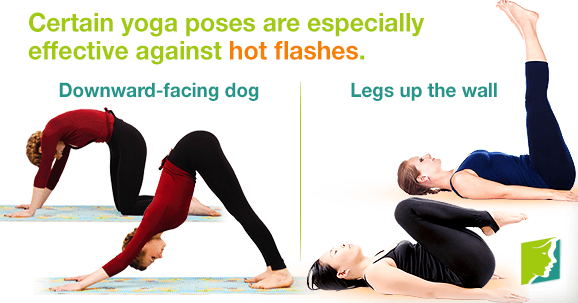
What we now need to know, is how do we use Yoga to reduce those pesky Menopause symptoms, such as Hot Flashes, Night Sweats & the Rest of the bad bunch?
In general, any Yoga session will help to reduce these symptoms, because of the nature of the routines, but in our experience, these are the best 10 Yoga poses specifically for Menopausal Women in mind.
1 . Bridge Pose (Setu Bandhasana)
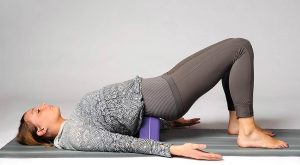
Menopause symptom reduced – Fatigue & insomnia + more
An excellent spine-elongating pose that’s more gentle than the full wheel pose, the bridge is an excellent way to relieve stress and target many symptoms of menopause in one pose. Practicing the bridge pose can also stretch the back, reduce fatigue and insomnia, and ease anxiety and headaches.
How to do the Bridge Pose
- Lying on your back, bend both knees and place the feet flat on the floor hip width apart. Slide the arms alongside the body with the palms facing down. The fingertips should be lightly touching the heels.
- Press the feet into the floor, inhale and lift the hips up, rolling the spine off the floor. Lightly squeeze the knees together to keep the knees hip width apart.
- Press down into the arms and shoulders to lift the chest up. Engage the legs, buttocks and mula bandha to lift the hips higher.
- Breathe and hold for 4-8 breaths.
- To release: exhale and slowly roll the spine back to the floor.
2. Reclining Bound Angle (Supta Baddha Konasana)
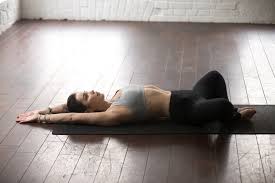
Menopause symptom reduced – Hot flashes, Anxiety + more
Eases Hot Flashes, restorative poses such as this, calm overactive adrenal glands so they’re better able to regulate hormonal balance
How to do the Reclining Bound Angle
- Lie down comfortably on your back, with your legs extended and your arms at your sides, palms face up toward the ceiling.
- Bend your knees to bring the soles (bottoms) of your feet together to touch. The outer (pinky toe) edges of your feet should be resting on the mat. Let the legs fall open and allow gravity to support the weight of the legs.
- Check in with your body. If your hips and groin are feeling tight, you can take your feet further away from your body; alternately, if you’re feeling more open, you can bring your feet closer toward your body to deepen the stretch.
- Relax your shoulders away from your ears and allow your back body to sink more deeply into the mat. Stay in the pose anywhere from one to five minutes, depending on your level of comfort.
- To come out of the pose, take the palms of the hands on the outer thighs to gently fold the legs together, and bring the soles of the feet flat down on the mat. Then, hug your knees into your chest and gently rock from side to side to release the low back.
3. Downward Facing Dog (Adho Mukha Svanasana)
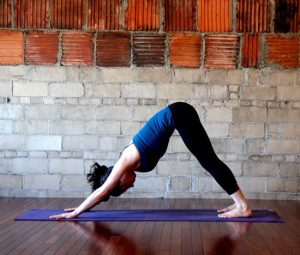
Menopause symptom reduced – Osteoporosis & stress + more
increases oxygen circulation in the brain, enhancing alertness. It also increases bone density and boasts muscle strength/ One of the most fundamental yoga positions, downward-facing dog helps to induce calm and relaxation while also stretching the upper back and legs. It’s also known to relieve symptoms of menopause, reduce menstrual pain and help prevent osteoporosis.
How to do Downward Facing Dog Pose
- Stand on four limbs, such that your body forms a table-like structure.
- Exhale and gently lift your hips and straighten your elbows and knees. You need to ensure your body forms an inverted ‘V’.
- Your hands should be in line with your shoulders, and your feet in line with your hips. Make sure that your toes point outwards.
- Now, press your hands into the ground and lengthen your neck. Your ears should touch your inner arms, and you should turn your gaze to your navel.
- Hold for a few seconds, and then, bend your knees and return to the table position.
4. Standing Forward Bend (Uttanasana)
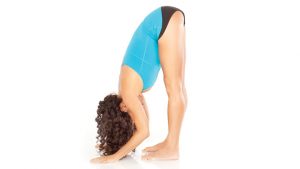
Menopause symptom reduced – Osteoporosis & stress + more
The standing forward bend is commonly used to treat the symptoms of menopause and osteoporosis. It can help to reduce stress and calm a busy mind, in addition to gently stretching the hips and hamstrings.
How to do the Standing Forward Bend
- Stand at the edge of the mat.
- Keep your feet at hip-width.
- Take your right arm up and stretch to the right side.
- Hold for 2 breaths and switch to the left side.
- Bend your torso forward, tucking your chest into your knees.
- You can keep dumbbells on the floor and pick them up as you return to the standing position.
5. Plow Pose (Halasana)
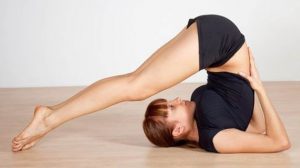
Menopause symptom reduced – Anxiety & irritability + more
- Lying on the floor with the arms along side the body with the palms down, bend the knees and kick and rock the legs up and back, bringing the bent knees to the forehead and placing the hands under the hips.
- Slowly straighten the legs, reaching the toes to the floor over the head.
- When the toes touch the floor, you can release the arms into one of three positions: a) along the floor, palms down behind your back; b) interlace the fingers behind your back and gently squeeze the shoulder blades together; c) slide the arms over your head and hold onto the toes.
- Breathe and hold for 4-10 breaths.
- To release: bend the knees back to the head, and carefully and slowly roll the spine back onto the floor.
6. Seated forward Bend (Paschimottanasana)
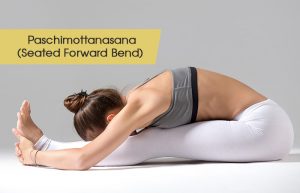
Menopause symptom reduced – Stress & depression + more
- From Staff pose, inhale the arms up over the head and lift and lengthen up through the fingers and crown of the head
- Exhale and hinging at the hips, slowly lower the torso towards the legs. Reach the hands to the toes, feet or ankles.
- To deepen the stretch: A) Use the arms to gently pull the head and torso closer to the legs. B) Press out through the heels and gently draw the toes towards you.
- Breathe and hold for 3-8 breaths.
- To release: A) Slowly roll up the spine back into Staff pose. B) Inhale the arms back over your head as you lift the torso back into Staff pose.
7. Child’s Pose (Balasana)
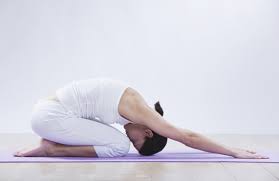
Menopause symptom reduced – Stress, anxiety, fatigue + more
- Kneel on the floor. Touch your big toes together and sit on your heels, then separate your knees about as wide as your hips.
- Exhale and lay your torso down between your thighs. Broaden your sacrum across the back of your pelvis and narrow your hip points toward the navel, so that they nestle down onto the inner thighs. Lengthen your tailbone away from the back of the pelvis while you lift the base of your skull away from the back of your neck.
- Lay your hands on the floor alongside your torso, palms up, and release the fronts of your shoulders toward the floor. Feel how the weight of the front shoulders pulls the shoulder blades wide across your back.
- Balasana is a resting pose. Stay anywhere from 30 seconds to a few minutes. Beginners can also use Balasana to get a taste of a deep forward bend, where the torso rests on the thighs. Stay in the pose from 1 to 3 minutes. To come up, first lengthen the front torso, and then with an inhalation lift from the tailbone as it presses down and into the pelvis.
8. Camel Pose (Ustrasana)
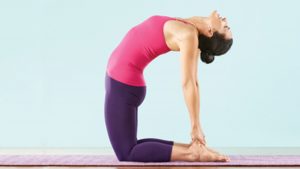
Menopause symptom reduced – backache, anxiety & fatigue + more
- Begin the asana by kneeling on your mat and placing your hands on your hips.
- You must ensure that your knees and shoulders are in the same line, and the soles of your feet are facing the ceiling.
- Inhale, and draw your tailbone in towards your pubis. You must feel the pull at the navel.
- While you are doing that, arch your back. Gently slide your palms over your feet and straighten your arms.
- Keep your neck in a neutral position. It should not be strained.
- Hold the position for about 30 to 60 seconds before you release the pose.
9. Corpse pose (Shavasana)
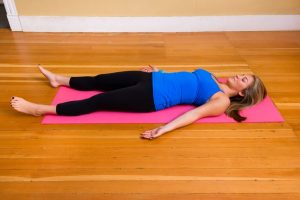
Menopause symptom reduced – Anxiety, stress + more
- Lying on your back, let the arms and legs drop open, with the arms about 45 degrees from the side of your body. Make sure you are warm and comfortable, if you need to place blankets under or over your body.
- Close the eyes, and take slow deep breaths through the nose. Allow your whole body to become soft and heavy, letting it relax into the floor. As the body relaxes, feel the whole body rising and falling with each breath.
- Scan the body from the toes to the fingers to the crown of the head, looking for tension, tightness and contracted muscles. Consciously release and relax any areas that you find. If you need to, rock or wiggle parts of your body from side to side to encourage further release.
- Release all control of the breath, the mind, and the body. Let your body move deeper and deeper into a state of total relaxation.
- Stay in Shavasana for 5 to 15 minutes.
- To release: slowly deepen the breath, wiggle the fingers and toes, reach the arms over your head and stretch the whole body, exhale bend the knees into the chest and roll over to one side coming into a fetal position. When you are ready, slowly inhale up to a seated position.
10. Legs up the Wall Pose (Viparita Karani)
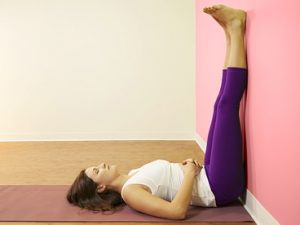
Menopause symptom reduced – Insomnia, fatigue + more
- Place a bolster or two thickly folded blankets lengthwise along a wall, approximately three or four inches away from the edge where the floor meets the wall (the idea here is to create some elevation for the hips while supporting the pelvis and low back as the body softens into the pose).
- Facing away from the wall, come to hands and knees on the right side of your bolster or blankets, with your shins parallel to the short edge of your support, and your toes touching the wall.
- Thread your left arm through the gap between your right arm and your right leg, palm facing up, and lightly roll onto your left side, allowing your hips to pivot and come down onto your support, and your legs to sweep up the wall. Note that the sit bones and the backs of the legs don’t necessarily need to be making full contact with the wall here; there should simply be a sensation of soft support.
- Release the expectation that your immediate experience of the pose should be comfortable, and instead allow yourself the time to make whatever adjustments you need to make in order to find a physical expression of the pose that feels appropriate for your body — whether that means adjusting the distance between the bolster and the wall, shifting the hips, taking a slight bend in the knees, or placing a folded blanket or towel underneath the head or neck to maintain the natural curve of the cervical spine.
- Once you feel comfortable, allow your arms to fall open, palms facing up toward the ceiling. Soften your shoulder blades down and let your body be completely supported by the earth. Feel the femurs (thigh bones) drop more deeply into the hip sockets. Let the breath be natural and soft.
- Remain here anywhere from 3-15 minutes (or longer!). To come out of the pose, gently bend your knees as much as you need to press the soles of your feet into the wall, lift your hips up and off of your support, then roll over onto your right side. Whenever you feel ready, press yourself up to sit.