9 Yoga Stretches To Reduce Your Lower Back Pain
Disclosure: As an Amazon Associate I earn from qualifying purchases. This page may contain affiliate links, which means I may receive a commission if you click a link and purchase something that I have recommended. There is never an additional cost to you.
What Causes Lower Back Pain?
As a sufferer for years I wanted to find out what was causing my Lower Back Pain. After extensive research here’s what I found out about the Causes of Lower Back Pain.
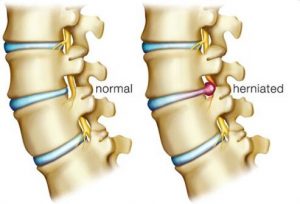
In general terms the weight of the upper body puts a real strain on the lower back. Your spine has 32 vertebrae (small bones) stacked on top of one another, with a spongy cartilage in between, called a disc. This acts like a type of shock absorber, otherwise the vertebrae would grind against one another and movement would be severely painful if at all possible. With age, these disc get worn, just like the discs on a car brake system, by a condition called degenerative disc disease.

This puts pressure on the jelly like substance and sometimes causes the discs to bubble, causing what we call a “slipped disc” or “ruptured disc” medical term an “herniated disc”. This causes the newly formed bulge to press on the sensitive nerves that run all along the vertebrae, causing us the pain. If the “slipped disc” is in the lower back area, we can get pain in the buttocks, pelvic area and even down your leg. This is commonly referred to as “Sciatic pain”
These “slipped discs” are the most common causes of lower back pain, but there are other causes such as:
- Disc Tear- where the disc actually tears and cartilage leaks out rather than ballooning
- Spondylolisthesis- where the actual bone presses on the nerves
- Fractures of the vertebrae caused by Osteoporosis (brittle bones)
- Scoliosis- where the spine curves abnormally causing back pain
- Spinal Stenosis- narrowing of the spine around the spinal cord, typically caused by bone spurs from Osteoporosis
- Pinched nerve- less common but possible
- Diabetes- again, less common but possible
How can I ease Lower Back Pain?

Here are some ways to prevent or reduce Lower Back Pain
- Correct Posture when lifting objects- this is one of the main causes of lower back pain. Remember to bend your knees with straight back, not straight knees & bent back!
- Correct Posture when sitting- Try to keep the back erect when sitting and don’t slouch
- Stop Smoking- recent research has shown smokers a third more likely to suffer with lower back pain
- Don’t Stay in bed when in pain- I know it’s hard, but movement is the best remedy for a bad back, unless severe pain that is!
- Talk to your doctor early on so a course of treatment can be agreed upon
- Do exercises that strengthen the back and the supporting area, pelvis, hips, etc.
- Try yoga- Strengthens and stretches the lower back reducing pain and preventing further problems
How does yoga help sooth lower back pain?
Back pain is very common all over the world but in the US 80% of citizens will be affected by it at some point if their lives, some with mild symptoms others with severe debilitating pain. Some people are in so much pain they simply can’t work anymore and face increased hardship and worsening health because they can’t exercise and have limited mobility.
This is why more and more people are turning to Yoga for aching backs.. Many studies have shown the great power of the ancient practice, in reducing back pain and soreness, indeed, any pain is possible to overcome with proper yoga practices. According to researches, yoga may even help reduce the need for medication in many people. In a recent study a group of back ache sufferers were assigned physical therapy, another group were assigned yoga, and a third group assigned reading about management of pain. 70% of the groups were taking medication for their back pains. However, at the end of the study, the reading group stayed the same, but the physical therapy and yoga groups had reduced to just 50% now taking medication.
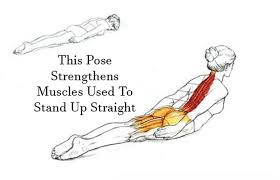
I t is thought that certain yoga postures help lengthen the spine by strengthening & stretching the muscles, replacing your back’s proper alignment in the process. Strengthening those muscles, improves your posture and reduces the load bearing weight on your back, thereby reducing your aches and pains. The stretching increases flexibility and allows increased blood to flow to those over tight muscles.
The basics of yoga are very beneficial to your health so it’s very likely going to have a positive effect on your back pain. There is also the fact that yoga improves ones pain threshold by using the breathing techniques taught in all yoga poses. You will be able to emit toxins in your breath which all helps to reduce the causes of back pain and reduce the actual pain you feel. A win win situation for all!
Although countless studies have shown yoga to be great at reducing pain, it may not be such a good idea if you are in sever pain as major damage could result from any stretching or pulling of an already inflamed muscle or ligament. If you are already in severe or chronic pain, it’s always advisable to ask your doctor before starting your yoga routine. Obviously, when practicing yoga, don’t try to do too much at once, so try not to over stretch. And tell your instructor about your back problems so they can guide you through the motions!
If your OK to go, why not start with these poses. They can be done in any order and of course, your other body parts will feel the fantastic benefit of yoga.
What Yoga Lower Back Stretches Should I do?
Try these yoga poses to help exercise your lower back pain.
1. Downward Facing Dog Stretches The Hamstrings

A classic yoga pose that targets your hamstrings and lower back, helping you reduce current pain and prevent further injuries especially when lifting heavy objects, as this stretch helps support and build muscle in the lower back region.
How to do it-
- Stand on four limbs, such that your body forms a table-like structure.
- Exhale and gently lift your hips and straighten your elbows and knees. You need to ensure your body forms an inverted ‘V’.
- Your hands should be in line with your shoulders, and your feet in line with your hips. Make sure that your toes point outwards.
- Now, press your hands into the ground and lengthen your neck. Your ears should touch your inner arms, and you should turn your gaze to your navel.
- Hold for a few seconds, and then, bend your knees and return to the table position.
2. Child’s pose Helps Elongate The Back
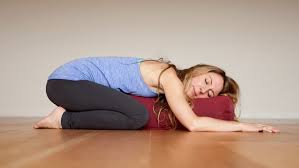
This is a stretch that elongates the back, reducing tension between the vertebrae and the discs. Also a great de-stressor before bed.
How to do it-
- Start on all fours with your arms stretched out straight in front of you,
- then sit back so your glutes (butt muscles) come to rest just above — but not touching — your heels.
- Hold the position for 5 to 10 breaths, and
- repeat as many times as needed for a good, soothing stretch.
3. Triangle Pose helps lengthen and strengthen Torso muscles
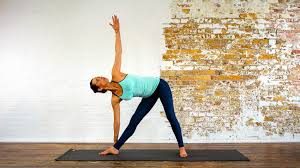
A great stretch for lengthening the muscles on your outer hip and lengthening the muscles on your Torso side. Whilst also strengthening your back and hips.
How to do it-
- Start standing straight with feet together.
- Next, lunge your left foot back three to four feet, and point your left foot out at a 45-degree angle.
- Turn your chest to the side and open up the pose by stretching your right arm toward the ground and the left arm toward the ceiling, keeping both your left & right legs straight.
- You probably won’t be able to touch the ground with your right arm at first, so don’t overstretch — only bend as far as you can while maintaining a straight back.
- Hold the position for 5 to 10 breaths, then switch to the other side
- repeat as needed.
4. Cat Cow Pose Eases Tension In Back Muscles
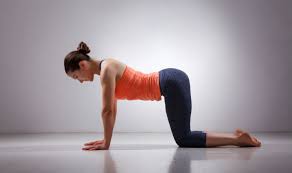
This stretch exercises all sections of the back by strengthening, stretching and releasing tension in the spine. Your slow breathing helps reduce pain and prevent further injuries.
How to do it-
- Bring your hands and knees to the floor.
- Make sure your knees are in line with your hips, and that your wrists are in line with your shoulders and your back and head are centered.
- On an inhale slowly drop your belly towards the floor as you lift your hips, roll your shoulders back and raise your chin towards the sky.
- On an exhale, press your palms firmly into the mat as you curve your spine, rounding the shoulders and tucking the tailbone in.
5. The Cobra Pose
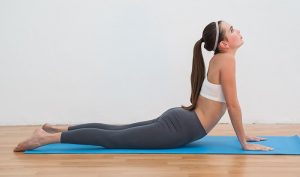
This is an ideal exercise as it stretches the back quite gently and strengthens the spine. Ideal for slipped discs and osteoporosis.
How to do it-
- Lie face down on your mat with your feet hip width apart.
- Place your palms next to your rib cage, keep your elbows tucked tightly to your sides and your public bone pressed into the floor.
- On an inhale press your palms into the mat and slowly lift your chest and upper belly off the ground.
- Roll your shoulders back. Elongate the neck, ensuring your ears are lifted away from your shoulders.
- Inhale slowly for 5 seconds. Hold. Exhale for 5 seconds. Slowly release your self back onto the mat.
6. Upward Forward Bend Reduces Tension in Hamstrings & Lower Back
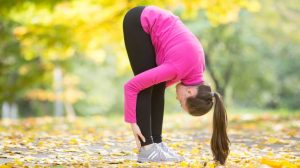
Some folks call it the forward fold, either way, it’s a great way to reduce tension in the shoulders, while stretching and strengthening the back muscles, hamstrings and the pelvic region.
How to do it-
- Stand straight with feet shoulder-width apart and your knees not locked but loose.
- While you exhale, hinge at your waist and bend forward, reaching toward the floor.
- stop wherever your hamstrings feel a comfortable stretch.
- Repeat the pose five to seven times. On the last bend hold the position for 5 to 10 breaths.
7. Knees To Chest Lengthens the Spinal Muscles
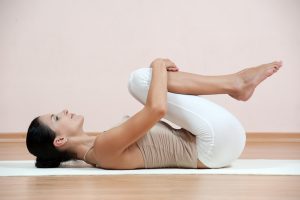
Sometimes called the “wind releasing pose” (always gets a giggle in class), this yoga exercise not only lengthens the erector spinae muscles that run either side of your spine, but also the gluteus maximus and hamstrings. The breaths release toxins from your body so you’ll feel healthier also!
How to do it-
- Lie down on your back.
- Check you are relaxed and symmetrical. Support the head with a blanket or pillow if preferred.
- Tune into the natural breath moving in and out of the nostrils. Breathe freely and naturally.
- With your knees and feet hip-width apart, use the hands to gently bring the knees toward the chest as you breathe in. (Hands can either hold the knees, or the back of the thighs, whichever feels right.)
- Keep your head and shoulders resting comfortably on the floor. Draw the knees in only as far as is comfortable, while keeping the shoulders relaxed, broad and grounded.
- When you are ready to exhale, straighten the arms as you guide the knees away from you.
- Repeat 3-5 rounds, moving with the breath; Breathe in, knees away, breathe out, knees in toward the belly.
- When you are ready to come out of apanasana, roll out to the side, press yourself up to a seated position, and observe how you feel.
8. Seated Spinal Twist For Improved Posture
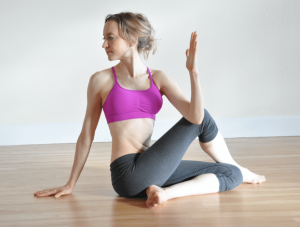
This improves spine mobility and posture by strengthening the back and prevents further problems as you age.
How to do it-
- Start off in the seated position
- Bring your left foot outside your right knee.
- Extend your right arm up, hook your right elbow outside your left knee and look over your left shoulder.
- Hold for three breaths before repeating on the opposite side.
9. The Bow Pose Reduces Tension in Lower Back
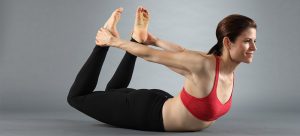
Quite an intense little exercise and not to be attempted if you are in moderate pain. This exercise stretches and strengthens the upper back and shoulders, creating better posture and releasing tension in the lower back.
How to do it-
- Lie face down on your stomach
- With both hands, reach for your heels and lift them up
- Your back will naturally come with you.
- Hold for three breaths.
- Repeat
Thanks for stopping by. You may be interested in our post “What are the benefits of yoga for mental health?”
