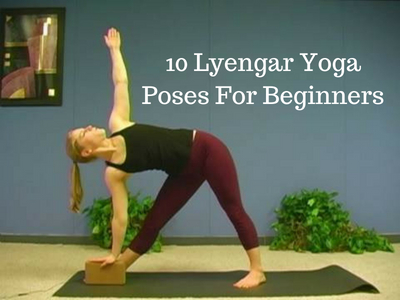
10 Lyengar Yoga Poses For Beginners
Disclosure: As an Amazon Associate I earn from qualifying purchases. This page may contain affiliate links, which means I may receive a commission if you click a link and purchase something that I have recommended. There is never an additional cost to you.
In our post “What is Lyengar Yoga and why should I try it?” we discuss the fundamentals of Lyengar Yoga and why you should indeed try it!
In this post we will delve into the actual poses (postures) that beginners can use to enhance their experience with Lyengar Yoga. As with all styles, it’s always best to try Lyengar yoga positions for beginners under the guidance of a certified instructor. He or she will be a font of information regarding the history of the posture, gradual modifications that help you get into full pose, and tips to prevent injury.
Here are 10 Lyengar Yoga Poses For Beginners.
1. Sukhasana – Easy Pose
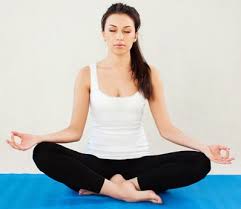
Sukhasana, called the “easy pose” is a very common pose for practicing meditation and breathing exercises (called “pranayama”). It is also often used as an alternative to practicing the Lotus Pose (Padmasana) for those whose hips are very tight.
How to do the Easy Pose-
- Be seated on support so that your knees are in line with or lower than your hips.
- Cross your right shin in front of your left shin in the centerline of the shins and the torso is lifted.
- Move your shoulders back to open the chest and the hands rest on the upper thighs.
- The head balances on the top of spine. Close your eyes and draw the breath in and out.
- After 60 seconds, stretch your legs out and then change the cross of the legs so that the left shin is crossed in front of the right.
Benefits of the Easy Pose are:
- Improves mental and physical balance without causing strain or pain.
- Great for practice of meditation and pranayama.
- Improves tight hips for those who cannot sit in advanced postures like Padmasana.
- Brings a sense of calm and peace through your mind and body.
- Helps to relax your brain.
- Strengthens and stretches the back
- Elongates knees and ankles
- Sukhasana or The Easy Pose helps in broadening of chest and collar bones
- Improves body alignment
- The Easy Pose helps elongate your spine.
- While practicing this pose, you will feel the stress, tension and anxiety melting from your body.
- Sukhasana help to balance the mind, increases the power of concentration, and induces physical and mental relaxation quickly. The thinking process becomes very clear and precise
- Refreshes and rejuvenates you and also relieves you of stress and mild depression.
- Increases flexibility during difficult situations
2. Vrksasana – Tree Pose
If you’ve ever slipped on a patch of ice, you probably understand the benefit of having a good sense of balance. Practicing balancing poses in yoga, such as Tree Pose, will help you gain both physical and mental steadiness.
Tree Pose improves concentration and focus while calming your mind. Its Sanskrit name, “Vrksasana” (vrik-SHAH-suh-nuh), comes from two words:
- “Vrksa,” which means “tree”
- “Asana,” which means “pose”
The word “asana” can also be translated as “seat.” Many of the original ancient yoga poses were seated postures. As the practiced developed, standing poses were introduced, but the seated, meditative aspect still remained. Tree Pose, with its calming and meditative benefits, is like a standing variation of a seated meditation posture. Keeping calm and focused while balancing on one foot will teach you to sway gently like a tree in the wind, steady and sure no matter what the outside circumstances may be.
How to do the Tree Pose-
- Stand up erect and balance the weight on the feet.
- Shift the weight to your left foot as you bend the right knee and place the sole of the foot on the calve or the inner thigh of the left leg.
- Try to maintain your balance as you draw the outer left hip in and keep the pelvis level.
- Keeping the left leg steady, extend from the inner right groin to the inner right knee and maintain the knee in line with the pelvis.
- Raise the chest and lift the arms up into Urdvha Hastasana.
- Now balance on the standing leg and steady your gaze and breathe.
- Lower the arms and lower the foot and repeat the pose while standing on the right leg.
Benefits of the Tree Pose are:
- Strengthens the spine while improving both poise and balance.
- Improves and aids neuro-muscular coordination.
- Tones the leg muscles while making the ligaments and tendons of the feet stronger.
- Knees become stronger, and the hip joints are loosened.
- Strengthens the eyes, inner ears, and shoulders.
- Relieves those suffering from sciatica and reduces flat feet.
- Makes you more stable, flexible, and patient.
- It enhances concentration and activates all the mental faculties.
- Helps to deepen the thorax.
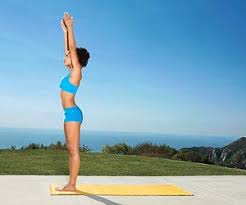
3. Urdhva Hastasana – Upward Hands Pose
For many of us, Urdhva Hastasana is a pose we practice a variation of unconsciously every morning: We roll out
of bed, stand up—eyes half open, yawning—raise the arms, arch the spine, and take the head back. It is an intuitive movement that
helps get energy moving after a night’s sleep. When we encounter this pose for the first time in a yoga class, we often take it for granted. Why waste time practicing a pose we feel “good” at when there are many more poses to conquer?
How to do the Upward Hands Pose-
- Stand up straight .
- Maintaining the stretch in the arms, lift the arms to shoulder height.
- Externally rotate the arms, so that the outer upper arms moves in towards your face.
- Keep the external rotation as you lift the arms over head.
- Continue to stretch the arms all the way from the armpits to the fingertips.
- Feel how the stretch of the arms lengthens the entire side body.
- Keep the weight even on the feet and the knee caps lifted, lower the arms back down to your sides.
Benefits of the Upward Hands Pose are:
- Stretches the belly
- Improves digestion
- Stretches the shoulders and armpits
- Helps relieve mild anxiety
4. Paschimottasana – Sitting Forward Bend
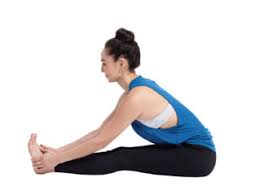
This helps you stretch the hamstrings and the back. Never force the stretch – use pillows or bolsters to ease into the posture. As you build flexibility and knowledge of the posture, you’ll use the props less.
How to do the Sitting Forward Bend-
- Sit erect, with your legs, stretched out in front of you. Make sure that your toes are flexed towards you.
- Inhale and raise your arms over your head. Stretch.
- Exhale and bend forward. Feel the fold from your hip joints. Your chin should move towards your toes.
- Stretch out your arms, and let them reach the furthest they can, possibly till your toes. But make sure that you don’t stretch too far.
- Inhale. Then, lifting your head slightly, elongate your spine.
- Exhale and move your navel towards your knees.Repeat this a few times.
- Then, place your head on your legs, and hold the pose.
- Inhale and come up back to the sitting position with your arms stretched out.
Benefits of the Sitting Forward Bend are:
- Calms the brain and helps relieve stress and mild depression.
- Stretches the spine, shoulders, hamstrings.
- Stimulates the liver, kidneys, ovaries, and uterus.
- Improves digestion.
- Helps relieve the symptoms of menopause and menstrual discomfort.
- Soothes headache and anxiety and reduces fatigue.
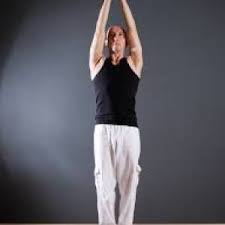
5. Tadasana Variations – Mountain Pose
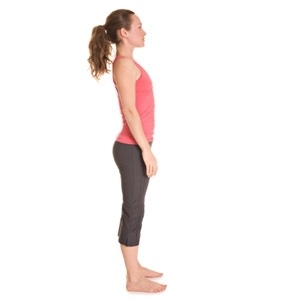
adasana, or Mountain Pose, is a basic standing posture and is, therefore, the foundation for all others. Physically, it helps to create space within the body, allowing internal organs to work more efficiently. This can drastically improve respiration as well as digestion and circulation. Mentally, it leaves its users invigorated and motivated, making it perfect for an early A.M. yoga session.
One of the easiest Iyengar yoga positions for beginners, this pose features arm variations to help extend breath and center the mind and body.
Some people use a strap to complete arm positioning.
How to do the Mountain Pose-
- Start by stretching your toes and rolling your ankles.
- Stand straight and center your weight on all four corners of your feet.
- As if someone is lifting you up by a string, bring your shoulder blades down into your back.
- Firm the thighs, but do not lock the knees.
- Soften the eyes, and let tension drain from your face.
- Relax the arms at your sides.
- Keep your chest wide, but do not stick your ribs out to breathe. Let the breath flow from your lower abdomen, rising up and out the nose.
Benefits of the Mountain Pose:
- Improves posture.
- Strengthens thighs, knees, and ankles.
- Increases awareness.
- Steadies breathing.
- Increases strength, power, and mobility in the feet, legs, and hips.
- Firms abdomen and buttocks.
- Relieves sciatica.
- Reduces flat feet.
6. Adho Mukha Svanasana – Downward Facing Dog Pose
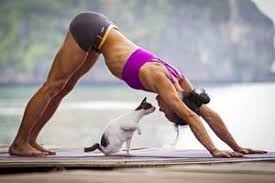
The most basic and widely-known yoga pose is down dog. Even if you’ve never attended a yoga class, you most likely have heard of this one. However common the pose may be, it’s often assumed and untaught in the yoga studio. Downward facing dog has many jobs and functions, among them–assessment pose, transitional pose, resting pose, strengthening pose, inversion
How to do the Downward Facing Dog-
- Come down to the floor and kneel on all four limbs. The hands are underneath your shoulders and the knees are underneath the hips. The toes point straight back.
- Stretch the fingers and press the palms down onto the floor as you turn the upper arms in and lift the chest.
- Maintain the lift in the chest and the stretch of the arms as you turn your toes under and lift the hips towards the ceiling.
- Use your arms to press your chest back towards your legs as you press the thighs back and reach the inner and outer edges of the feet towards the floor.
- Stretch your arms and stretch your legs as you reach the crown of the head towards the hands.
- Take a few deep breaths and then lower yourself to your knees and pause.
- Repeat the pose one or two more times and then rest.
Benefits of the Downward Facing Dog are:
- Stronger hands, wrists, low-back, hamstrings, calves and Achilles tendon
- Decrease in back pain by strengthening the entire back and shoulder girdle
- Elongated shoulders and shoulder blade area
- Decrease in tension and headaches by elongating the cervical spine and neck and relaxing the head
- Deepened respiration
- Decreased anxiety
- Increased full-body circulation
7. Chatush Padasana – Four Footed Pose
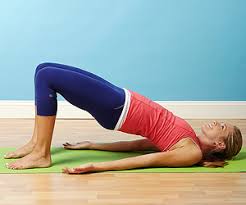
Chatuse Padasana, or four footed pose, has two distinct functions. First it is a universally accessible and easy-to-do backbend. You will get all the backbend benefits without all the fear and mental roadblocks you’ll find in other back bending asanas. But the second function and the real magic of this pose is that it introduces the proper shoulder actions supported all body pose, or shoulder stand.
How to do the Four Footed Pose-
- Lie down on your back. Bend your knees and place the feet hip width apart with the heels as close to the buttocks as possible.
- Ensure the feet are parallel and the feet press evenly as in Tadasana.
- Keep the feet where they are and hold on to the edges of your sticky mat as you externally rotate your arms and take the shoulder blades into the back.
- Take the outer shoulders down to the mat and lift the center of the chest. Maintain the lift in the chest as you press your feet and lift your pelvis off the ground.
- Extend the tops of the buttocks towards the backs of the knees and the outer hips to the outer knees.
- Press the outer shoulders and lift the chest towards the chin.
- Either place your palms down on the floor or interlace the fingers behind the back.
- Maintain the lift for 2 breaths and then lower your torso and pelvis onto the floor and rest.
Benefits of the Four Footed Pose are:
- Chatush Padasaana strengthens the back muscles
- Improves flexibility of the spine.
- Tones the nervous system and reduces fatigue.
- The organs in the pelvis are rejuvenated.
- Backbends lift the mood and help one develop confidence.
8. Utthita Trikonasana – Extended Triangle Pose
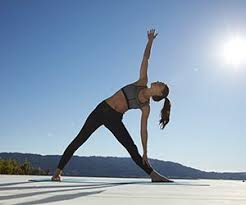
With the Extended Triangle pose (Utthita Trikonasana) physical alignment is quite exacting. When all the elements come together — stretch and strength, rooting and expansion — the result is a beautifully expressive ose that balances the grounding through our foundation with the lift of our peak, and reconnects body, breath and mind.
How to do the Extended Triangle Pose-
- Stand in Tadasana. Inhale and Exhale as you stretch the arms out at shoulder height and Separate the feet 3 – 3.5 feet apart.
- Turn the right foot out 90 degrees and the turn the left foot in slightly.
- Press the inner and outer of edges of the feet as you did in Tadasana and extend the torso over towards the right leg.
- Place your right hand on a block or right shin and stretch your left arm up towards the ceiling with the palm facing forward.
The legs are stretched as in Tadasana. The arms are externally rotated as in Urdhva Hastasana and the torso is extended from the pelvis through the crown of the head. - To come out, press the feet firmly and lift the torso back up to vertical.
- Turn the feet back to parallel as you take a breath and then on an exhale turn the left foot out and the right foot slightly in and repeat on the left side.
Benefits of the Extended Triangle Pose are:
- Stretches and strengthens the thighs, knees, and ankles
- Stretches the hips, groins, hamstrings, and calves; shoulders, chest, and spine
- Stimulates the abdominal organs
- Helps relieve stress and anxiety
- Improves digestion
- Helps relieve the symptoms of menopause
- Relieves backache, especially through second trimester of pregnancy
- Therapeutic for depression, anxiety, flat feet, infertility, neck pain, osteoporosis, and sciatica
9. Ardha Uttanasana – Half Standing Forward Pose
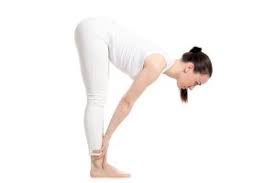
This is a foundation pose that prepares the body for deeper yoga postures. As a fundamental element of the Sun Salutation Series, this pose is favoured by Iyengar Yoga teachers for its back strengthening, posture improving properties
How to do the Half Standing Forward Pose-
- Stand in Tadasana with the feet hip distance apart.
- Place the hands on the hips and lift your chest as you take the elbows back.
- Keep the weight even on the feet as you take your torso to parallel to the floor.
- Place your hands underneath your shoulders on two blocks or on the floor
- Press your hands and move your shoulder blades into the back to keep your spine concave to the floor.
- Lift up on the knees as you turn the upper thighs in and press the thighbones back towards the back thighs.
- Stretch the side chest towards the armpits. Maintain that as you turn the upper arms in and stretch the center of the chest towards the crown of the head.
- Keep the weight even in the feet and maintain the hips over the heels as you place your hands on your hips and stand back up in Tadasana.
Benefits of the Half Standing Forward Pose are:
- Calms the brain
- Stretches the spine, shoulders and wrists (in the full pose), hips, and hamstrings
- Strengthens the legs
- Stimulates the abdominal organs
- Improves posture and sense of balance
- Improves digestion
10. Savasana – Corpse Pose
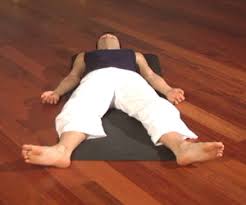
This reclining posture doesn’t always need props, but some people are more comfortable resting on a bolster with a pillow under the head. Take your time with this one – it’s extremely relaxing.
How to do the Corps Pose-
- Neatly, place a blanket lengthwise along the length of your sticky mat.
- Lie Down on your back and stretch the legs in Supta Tadasana. See that you are in the center of sticky mat.
Adjust the shoulders down your back as you did in Supta Padangustasana. - Allow your two feet to fall apart from one another, relaxing your leg muscles.
- Turn your upper arms from the inside out and place the arms equidistantly about 6 inches away from your body. The palms are turned up towards the ceiling.
- Relax every muscle in your body from the tip of your toes to the top of your head.
- Consciously relax the body and in so doing, quiet the mind and move into a deep relaxation for 15 minutes a day, if possible.
Benefits of the Corpse Pose are:
- Shavasana relaxes your whole body.
- Releases stress, fatigue, depression and tension.
- Improves concentration.
- Cures insomnia.
- Relaxes your muscles.
- Calms the mind and improves mental health.
- Excellent asana for stimulating blood circulation.
- Beneficial for those suffering from neurological problem, asthma, constipation, diabetes, indigestion.
- This posture brings a deep, meditative state of rest, which may help in the repair of tissues and cells, and in releasing stress. It also gives time for the yoga workout to sink in at a deeper level.
- This posture leaves you in a state of rejuvenation. It is the perfect way to end a yoga session, particularly if it has been a fast-paced one.
- It helps reduce blood pressure, anxiety, and insomnia.
- This is an excellent way to ground the body and reduce the Vata dosha(imbalance of the air element) in the body.